This guide assumes limited but some knowledge of ESXi and pfSense.
Requirements:
Rented dedicated server with a failover IP and ESXi 6 already included.
Goals:
- Install and configure ESXi
- Install and configure Pfsense
1) Install and Configure ESXi
Create and buy a Failover IP from your dedicated server provider. This is done with the IP settings of your dedicated server providers Control Panel. In our Example we use OVH. OVH comes with what is called a virtual MAC addresses for the Failover IP, this is required.
Install ESXi from the dedicated server control panel.
Once installed go to the dedicated server IP address in a web browser and download the vSphere Client.
Connect to your dedicated server IP using the vSphere client using the login and password that was supplied through email.
Once logged in to your vSphere Client, Click on the Host, click on the configuration tab, click on networking, click on add networking.

Click next through the wizard with default options, to create a new standard vSwitch.
Download and upload the ISO that will be required.
PfSense amd64 -> https://www.pfsense.org/download/
uBuntu -> http://www.ubuntu.com/download/desktop
Download the ISO to your desktop computer. To upload them for use with ESXi. Go to host configuration and storage. Then right click on the datastore and select Browse Datastore. Then create a new directory called “ISO” for storing your ISO images. Click on the ISO directory and then click on the Upload icon on the toolbar of the Datastore browser. Upload the ISO Files that was downloaded.

2) Install and Configure Pfsense
Create a new virtual machine. Select FreeBSD 64bit from the list of OS. We need to add a second network interface during hardware customization. Change the cdrom drive to boot off the pfSense ISO that was uploaded earlier and make sure it is connected. Set one network interface to be on the Virtual machines network and the other to be on the other network that you created earlier. Increase the RAM to 4gb or more and set 2 cores for the CPU.

Ignore the second CDROM that was added by mistake. The VM Network will be our PFsense WAN adapter.
Important: Before you start up the pfsense VM. Click on the network adapter that is going to be the WAN, network adapter 1. Then set the MAC Address to manual and input the virtual mac address that was assigned to the failover IP.
Now start up PFsense. To make configuring pfSense easier, we can do it from the web interface. To do this we need to run ubuntu live cd within the pfSense lan vSwitch network.
Create a new virtual machine picking ubuntu 64bit from the list. Add the ubuntu ISO as a boot option on the cdrom hardware configuration. Set the network interface to be in the pfsense lan vswitch. Once booted select the option to try ubuntu and boot from the livecd. Once booted, load up Firefox and go to 192.168.1.1 and login with admin/pfsense.
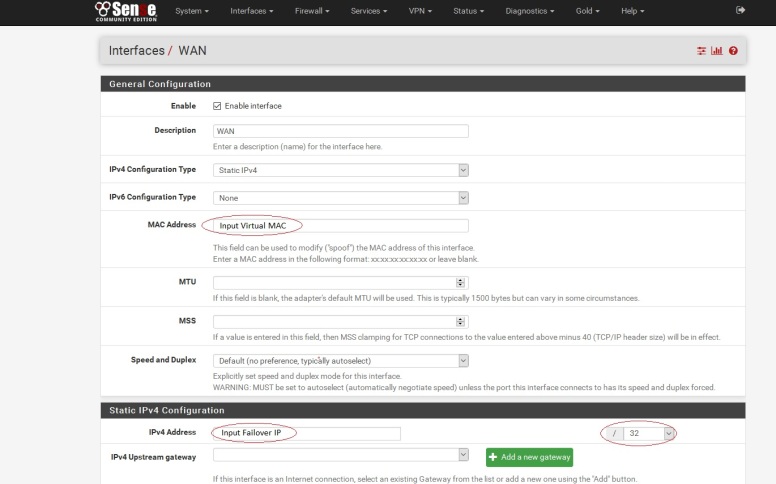
Set your pfSense WAN interface to the failover IP and /32. Input the virtual MAC address in to the MAC address field on the interface.

Now we need to add the gateway. In the latest PFSense there is an option to permit the use of gateways outside of the subnet. This new feature negates the need to run shell commands to setup the route.
Click on System, Routing, Add gateway.

The gateway of your Main IP not your failover IP, the IP that you are connecting to vsphere client on and .254 as the last octet. Example ip address is 99.23.23.54, gateway would be 99.23.23.254.
Select option to make it the default gateway.
Important: Then click the advanced button and enable the option right at the bottom. “Use non-local gateway through interface specific route.” Click save.
Now go back to the WAN interface and make sure the Gateway is assigned to the WAN interface.
You should now have internet working on pfsense and the ubuntu live CD. Test to confirm.
Any Virtual machines that require internet access should be put in to the pfSense LAN vSwitch and DHCP will auto configure.